Monday, February 27, 2017

ADF Security - Custom Login Page to get into Application


In this article, we will see ADF security with an example.  We will create an application which has 2 pages. Page-1 is individual ADF page outside any bounded task flow and Page-2 is within bounded task flow.
User needs to login using CustomLogin.jspx page and once Login is successful, user gets landed into “HomePage.jsf” which has links to Page -1 and Page-2.
ADF security is defined at application level, by navigating to “Application->Secure->Configure ADF Security…”


This opens up a wizard, in Authentication Step, define Form-based Authentication and we can choose Login Page, Error Page or Generate Default Pages.

Define Welcome Page in Step 4 as shown below:-


CustomLogin page contains a form with username and password input text fields, as shown below:-


Once user clicks submit, LoginBean(Managed Bean) code gets invoked as shown below:-
    public void doLogin(ActionEvent event) {
         System.out.println("Entering doLogin -- START 123");
         FacesContext ctx = FacesContext.getCurrentInstance();

         if (userName == null || password == null) {
            showError("Invalid credentials",
                        "An incorrect username or password was specified.", null);
         } else {
             ExternalContext ectx = ctx.getExternalContext();
             HttpServletRequest request = (HttpServletRequest)
                                          ctx.getExternalContext().getRequest();
             try {
                 request.login(userName, password); // Servlet 3.0 login
                 userName = null;
                 password = null;

                 String loginUrl = ectx.getRequestContextPath() +"/adfAuthentication?success_url=/faces/HomePage.jsf";
                 redirect(loginUrl);
             } catch (ServletException fle) {
                 showError("ServletException", "Login failed. Please verify the username and password and try again.", null);
             }
         }
         System.out.println("EXITING doLogin -- END ");
     }
Above code redirects to Home Page which has links to Page 1 and Page 2


Page-1 is individual page outside bounded task flow which shows employee details.
Page-2 is within EmployeeTaskFlow with single page SecuredPG.
Logout code is included in LoginBean as shown below:-
    public void doLogout(ActionEvent actionEvent) {
        ExternalContext ectx = FacesContext.getCurrentInstance().getExternalContext();
        HttpSession session = (HttpSession)ectx.getSession(false); 
        session.invalidate(); 
        String loginUrl = ectx.getRequestContextPath() +"/adfAuthentication?success_url=/faces/CustomLogin.jspx";
        HttpServletRequest request = (HttpServletRequest)ectx.getRequest(); 
        ServletAuthentication.logout(request); 
        ServletAuthentication.invalidateAll(request); 
        ServletAuthentication.killCookie(request);         
        try{ 
             ectx.redirect(loginUrl); 
           } 
           catch(Exception e){ 
             e.printStackTrace(); 
           } 
           FacesContext.getCurrentInstance().responseComplete(); 
    }

We define 2 users “hasaccess” and “noaccess” and assign Application Roles by navigating to Application->Secure->Test Users & Roles


Below screenshot shows the resources to which “AllowAccess” role has access to


Below screenshot shows the resource grants to which “NoAccess” application role has access to:-


I have also used test-all application role which gives access to everyone for CustomLogin page.
Also defined Grants at “TaskFlow” level as shown below:-


You can download application from below link


Test Scenarios:-
When “hasaccess” logs in, he can navigate to Page-1 i.e.  Employee Page  as well as Page -2 i.e. SecuredPG. Whereas “noaccess” can login and see home page but get error when he clicks on those links.

P.S. : For opening Employee details Page, you need to setup database connection which is not present in attached application.

Monday, February 20, 2017

Creating Editable Table in ADF


Creating Editable Table in ADF


In this article, we will learn how to create editable table in ADF. We will be using HR Schema’s Employees table.

STEP-1 : CREATING APPLICATION AND PROJECT
     
1.Create an application, by clicking File->New->Application


2.    Select “ADF Fusion Web Application”


3.    Complete the wizard by giving application name as “EditableTblAppln”, let defaults remain for project details. Enter desired default package name.

STEP 2: CREATING MODEL AND VIEW OBJECTS

1.    Right click on “Model” project, select New->Business Components from Tables…


2. Create new Database connection, by entering details


3.    Select “Employees” table in the wizard


4.    Create “Entity-based View Object” as “EmployeesView”, as shown below, do not change default values in further steps :-

STEP 3:  CREATING PAGE

1.    Right click on “View Controller” project and click New->Page…


2.    Give page name and select required layout
3.    Drag “EmployeeViews1” from “Data Control” and drop on to the page, Select “Table/List View->ADF Table…”


4.    Select “Selection” as “Multiple Rows” as shown in below screenshot:-


5.    Select the table in JSF page and edit the properties as shown in below screenshot for enabling page navigation in the table and for displaying 10 rows in one page.

6.    Change ScrollPolicy to “Page”


7.    Range Size to 10, for displaying 10 rows in one page, default is 25


8.    Create 3 buttons for “Create Employee”, “Delete Employee” and “Save Changes”

9.    Set binding for each of this buttons, click on “binding” button in button properties


10. Select “CreateInsert” under “EmployeesViews1”


Similarly repeat the steps by defining the binding for “Delete” button.
Similarly repeat the steps by defining the binding for “Save Changes” button, select “Commit” available under “AppModuleDataControl->Operations”


11. Run the page and see the output.


Invoking Javascript in ADF Page


Invoking Javascript in ADF Page


In this article, we shall see how to invoke Javascript in ADF page declaratively and from Java code.

Invoking Javascript declaratively

In your JSF page, right click on “af:document” and select “Insert Inside Document-> ADF Faces…->”, select “Resource” from popup window


After you click “Ok”, pop window opens as shown below, select "Type"  as “javascript” and type in the JavaScript code in Resource as shown in below screenshot :-


Once you create a button, for invoking Javascript we need to add "Client Listener" under the button. 
Right click the button and select “Insert Inside Button-> ADF Faces…”


Select “Client Listener” in the pop window, as shown in below screenshot:-


In the pop window that appears, type “Method” as JavaScript function name created earlier and select "Type" as “action”(which implies JS invoked when button is clicked.)


Now test the page by clicking the button, JavaScript gets invoked as shown in below screenshot

One can use below JavaScript code, to use input text “userName” in javascript

function sayHelloUser(event){
   var source = event.getSource(); var userName = source.findComponent("userName").getValue();    
   alert("Hello "+ userName);
}

Invoking Javascript from Managed Bean


Sometimes it is required to show pop up message once business logic completes in managed bean, In such scenarios we can invoke JavaScript after business logic execution completes.
Define “Action” property for the button to invoke managed bean code.


In Managed Bean we use “ExtendedRenderKitService” java class for calling JavaScript as shown in below code snippet:-


Friday, February 17, 2017

Displaying messages in ADF Page


Displaying messages in ADF Page


In this article, we shall see different ways of adding messages on ADF page.

Scenario 1:

Showing message as pop up
Following code can be used for displaying error message on ADF page as a pop up message as shown in below screenshot:-


    public String showMessage() {
      
        // Below code shows message on the page as pop up
        //SCENARIO 1:  client Id is null, as it is not associated to any UI component

        FacesContext context = FacesContext.getCurrentInstance();
        FacesMessage msg1 = new FacesMessage("This is sample message");

        // set severity of the message
        msg1.setSeverity(FacesMessage.SEVERITY_ERROR);
        context.addMessage(null,msg1 );
   }

Scenario 2:

For displaying the message inline in the page i.e. as shown in below screenshot,:-


Look for af:messages component in JSF page and make “inline” property to “True” as shown in below screenshot:-


Scenario3:
In this scenario we will be showing message attached to a UI Component, in this case userName


Use below code for component specific message
    public String showMessage() {
       
        //SCENARIO 2:  Message has to be associated with UI component
        // Below code show message on the page associated to User name input text
        FacesContext context = FacesContext.getCurrentInstance();
        FacesMessage msg2 = new FacesMessage("This is sample message for name");

        // set severity of the messagge
        msg2.setSeverity(FacesMessage.SEVERITY_ERROR);
        context.addMessage(getUserName().getClientId(),msg2 );
        return "success";
    }

Scenario 4:

Displaying detailed message with HTML content as shown below:-


Use below code for displaying message in HTML format

  public String showMessage() {
       
        //SCENARIO 4:  Message has to be associated with UI component and details shown in HTML
        // Below code show message on the page
        FacesContext context = FacesContext.getCurrentInstance();

        FacesMessage msg2 = new FacesMessage("This is sample message for name");

        // set severity of the message
        msg2.setSeverity(FacesMessage.SEVERITY_ERROR);
        msg2.setDetail("<html><body><p>If you continously get this error, please contact System                                 Administrator or log a ticket by clicking on this link <a href=\"http://www.google.com\">Log                   Ticket</a></p></body></html>");
        context.addMessage(getUserName().getClientId(),msg2 );
        return "success";

}

BI Publisher: Dynamic Columns in Excel output


BI Publisher: Dynamic Columns in Excel output


In this article we shall see how to display columns dynamically in BI Publisher excel output using RTF template. In this example we will be using HR schema, locations, departments, employees tables.  Sample requirement is to display total no of employees in each location department wise. Output should be generated as shown below:-


For this report, our query will be

SELECT SUM(EMP_COUNT) EMP_COUNT,DEPARTMENT_NAME,DECODE(GROUPING_ID(CITY,DEPARTMENT_NAME),2,'000000000',CITY) CITY FROM (
SELECT   COUNT (*) EMP_COUNT, department_name, l.city
    FROM employees e, departments d, locations l
   WHERE e.department_id = d.department_id AND l.location_id = d.location_id
GROUP BY city, department_name
UNION ALL
-- This will return all combinations of department and city with zero employee count
SELECT   0, department_name, city
    FROM locations, departments)
GROUP BY grouping sets ((city, department_name),(department_name))
HAVING (SUM(EMP_COUNT)>0 AND GROUPING_ID(CITY,DEPARTMENT_NAME) = 2) OR GROUPING_ID(CITY,DEPARTMENT_NAME) <>2
ORDER BY city, department_name

In the above query I have used GROUPING SETS to get department totals to be displayed as the last row.

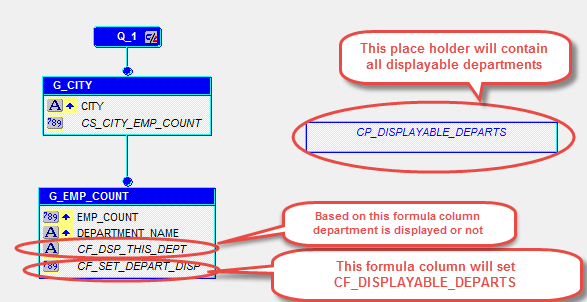
We shall eliminate the (a)city with zero employee count(in RTF using IF condition) and (b)departments with zero employee count in all cities in RDF using place holders and formula fields.

Below the RDF file snapshot


PL/SQL code for formula columns is as shown in below:-

1.       CF_SET_DEPART_DISP

function CF_SET_DEPART_DISPFormula return Number is
begin
                IF :CP_DISPLAYABLE_DEPARTS IS NULL THEN
                                :CP_DISPLAYABLE_DEPARTS := '';
                END IF;
  IF :CITY='000000000' AND :EMP_COUNT !=0 THEN
                :CP_DISPLAYABLE_DEPARTS := :CP_DISPLAYABLE_DEPARTS || ','||:DEPARTMENT_NAME;
  END IF;
  return 1;
end;

2.       CF_DSP_THIS_DEPT
function CF_DSP_THIS_DEPTFormula return CHAR is
begin
  IF INSTR(:CP_DISPLAYABLE_DEPARTS,:DEPARTMENT_NAME)!=0 THEN
                RETURN 'TRUE';
  ELSE
                RETURN 'FALSE';
  END IF;
end;


Sample XML generated by RDF file is shown below


In RTF we shall use “split-column-header”  and “split-column-data” to display the departments dynamically.

RTF snapshot is shown below:-
 

Download all code components mentioned below using Download Here link

1.       HR Schema Load Script
2.       RDF file
3.       RTF file